Jamjo ane Jamarjo Logo
Jamjo ane Jamarjo A Legacy of Bohra Flavours By Chefjuzer

✨Samosa Folding Class✨

By Chefjuzer • •
🏷️ Category: Snacks 🌱 Type: Vegetarian ⏱️ Prep: 15 minutes 🔥 Cook: 0 minutes
✨Samosa Folding Class✨

The secret to a neat shape and a properly sealed filling!

A well-folded samosa prevents the filling from spilling out during frying and gives it that classic triangular shape. Follow these simple steps to fold your samosa neatly every time.

Ingredients List
People
💡 Adjust serving size to recalculate ingredients
Sr. Weight Units Name
• 12 nos Samosa pattis
• 1 batch Prepared filling (1–2 tbsp per samosa)
• 1 batch Wheat flour paste (for sealing), as required
Method / Instructions
  1. 1. Position & Fold Triangle: Take one samosa patti vertically. Lift top-left corner and fold diagonally towards bottom-right to form a triangle; press edge gently.
  2. 2. Form Pocket: Fold the strip from right to left, shaping it into a neat pocket-like triangle. Ensure the pocket is properly formed before filling.
  3. 3. Add Filling: Add 1–2 tablespoons of filling into the pocket. Press down evenly so it settles inside without overfilling.
  4. 4. Seal: Bring the remaining open strip over the filled pocket diagonally, apply wheat flour paste to the edge, and press firmly to seal completely. Jamjo ane Jamarjo!
Nutrition Facts (Per 100 gms servings)
Nutrient (Basic) Amount (Approx.)
🔥 Calories45 Kcal
💪 Protein1.2 g
🌾 Carbohydrates8.5 g
🥑 Total Fat0.8 g
🧈 Saturated Fat0.2 g
🌱 Dietary Fibre0.4 g
🍬 Total Sugars0.2 g
🧂 Sodium60 mg

*Disclaimer: The nutritional values provided here are estimates generated for reference only and may vary based on exact ingredient brands and preparation techniques. Please calculate your nutrition independently if following a strict diet.

Chef's Notes & Tips

Chef’s Note

  • Mastering the fold and seal ensures your samosas retain their crisp, neat shape without leaking oil or filling during frying.

Tips & Tricks

  • Do not overfill the pocket; leave enough space to fold and seal the patti properly.
  • Keep unused samosa pattis covered at all times so they do not dry out and crack while folding.

✨Masala Bread Crumbs✨

By Chefjuzer • •
🏷️ Category: Basics 🌱 Type: Vegetarian ⏱️ Prep: 20 minutes 🔥 Cook: 10 minutes
✨Masala Bread Crumbs✨

Give your fried snacks a delicious desi twist!

Why settle for plain bread crumbs when you can combine dried bread with crunchy farsan, poha chivda, and salli wafer chivda? This gives your fried snacks an extra layer of flavour and a wonderfully savoury crunch in every bite.

Ingredients List
gms
💡 Adjust yield to recalculate ingredients
Sr. Weight Units Name
• 150 g Bread slices (approx. 6 nos)
• 100 g Mix farsan (approx. 1 cup)
• 60 g Poha chivda (approx. 1 cup)
• 30 g Salli wafer chivda (approx. ½ cup)
Method / Instructions
  1. 1. Dry the Bread: Take the bread slices and dry them completely in the sun until crisp.
  2. 2. Add the Crunch: Break the dried bread into smaller pieces in a mixing bowl, add the mix farsan, poha chivda, and salli wafer chivda, and mix well.
  3. 3. Grind: Transfer the mixture to a mixer-grinder and pulse into a coarse, crumb-like texture. Do not grind into a fine powder. Jamjo ane Jamarjo!
Nutrition Facts (Per 100 gms servings)
Nutrient (Basic) Amount (Approx.)
🔥 Calories380 Kcal
💪 Protein9.5 g
🌾 Carbohydrates52.0 g
🥑 Total Fat15.5 g
🧈 Saturated Fat3.5 g
🌱 Dietary Fibre4.2 g
🍬 Total Sugars5.0 g
🧂 Sodium480 mg

*Disclaimer: The nutritional values provided here are estimates generated for reference only and may vary based on exact ingredient brands and preparation techniques. Please calculate your nutrition independently if following a strict diet.

Chef's Notes & Tips

Chef’s Note

  • Combining crispy farsan and chivda with dried bread adds both seasoning and incredible texture to your snack coating.

Tips & Tricks

  • If you already have plain bread crumbs at home, use the quick shortcut by simply crushing and mixing in your favorite farsan and chivda.
  • Pulse the mixture carefully in the grinder so it retains a coarse, crunchy texture rather than becoming a fine powder.

✨Cleaning Methi Bhaji✨

By Chefjuzer • •
🏷️ Category: Basics 🌱 Type: Vegetarian ⏱️ Prep: 20 minutes 🔥 Cook: 0 minutes
✨How to Clean Methi Bhaji✨

Fresh and grit-free methi for your kitchen

Cleaning Methi Bhaji may be a little tedious, but once it is done, the effort is absolutely worth it. Fresh, properly cleaned methi gives your dishes a cleaner flavour, fresher aroma, and better texture.

Ingredients List
gms
💡 Adjust yield to recalculate ingredients
Sr. Weight Units Name
• 500 g Fresh Methi Bhaji (Fenugreek leaves)
• 1 batch Water, as required
Method / Instructions
  1. 1. Separate the Leaves: Start by separating the methi leaves from the stems, discarding thick stems and damaged leaves while keeping tender stems if desired.
  2. 2. Soak and Wash: Submerge leaves in a large bowl of water, gently moving them around to let dirt settle at the bottom, then lift leaves out into a colander rather than pouring directly.
  3. 3. Give Them a Fresh Rinse: Rinse the leaves thoroughly under fresh running water in the colander, repeating if any soil or grit remains.
  4. 4. Drain: Allow the methi to drain well in the colander. It is now clean, fresh, and ready for your favorite recipes. Jamjo ane Jamarjo!
Nutrition Facts (Per 100 gms servings)
Nutrient (Basic) Amount (Approx.)
🔥 Calories50 Kcal
💪 Protein4.4 g
🌾 Carbohydrates6.0 g
🥑 Total Fat0.9 g
🧈 Saturated Fat0.2 g
🌱 Dietary Fibre3.0 g
🍬 Total Sugars0.0 g
🧂 Sodium67 mg

*Disclaimer: The nutritional values provided here are estimates generated for reference only and may vary based on exact ingredient brands and preparation techniques. Please calculate your nutrition independently if following a strict diet.

Chef's Notes & Tips

Chef’s Note

  • Properly cleaned methi ensures your final sabzi, thepla, or paratha remains completely grit-free and retains its fresh, pleasant aroma.

Tips & Tricks

  • Always lift the leaves out of the wash water rather than dumping the bowl into a colander, so settled mud and dirt stay at the bottom.

✨Asli Homemade Ghee✨

By Chefjuzer • •
🏷️ Category: Basics 🌱 Type: Vegetarian ⏱️ Prep: 24 hours 🔥 Cook: 30 minutes
✨Homemade Desi Ghee from Malai✨

Is Ghee Really the Villain?

Ghee is the soul of our kitchen—bringing aroma, richness, and that authentic desi flavor to gol roti, malai Malida, and dal tadka. It's not just food; it's a memory.

Learn how to transform collected milk malai into rich, aromatic homemade desi ghee right in your own kitchen.

Ingredients List
gms
💡 Adjust yield to recalculate ingredients
Sr. Weight Units Name
• 1000 g Collected milk malai
• 2 tbsp Dahi (Yogurt)
• 1 batch Cold water, as required
Method / Instructions
  1. 1. Culture the Malai: Transfer 1 kg of collected milk malai to a large bowl, add 2 tbsp dahi, mix thoroughly, cover, and leave at room temperature for about 24 hours to develop a cultured taste.
  2. 2. Churn the Malai: Add plenty of cold water and cultured malai to a jar in batches, blend until butter (makkhan) separates, and gather the butter while reserving the chaas.
  3. 3. Don't Waste the Chaas: Use the leftover chaas for Kadhi, in gravies, or season with salt, black pepper, and roasted cumin powder for a refreshing drink.
  4. 4. Cook the Makkhan: Transfer butter to a heavy-bottomed pan over low heat. Simmer for 25–30 minutes, stirring occasionally until milk solids turn golden brown and ghee separates with a nutty aroma.
  5. 5. Strain and Store: Let ghee cool slightly, pass through a fine sieve to remove milk solids, and store in a clean, dry jar. Jamjo ane Jamarjo!
Nutrition Facts (Per 100 gms servings)
Nutrient (Basic) Amount (Approx.)
🔥 Calories900 Kcal
💪 Protein0.2 g
🌾 Carbohydrates0.1 g
🥑 Total Fat99.5 g
🧈 Saturated Fat🌱 Dietary Fibre0.0 g
🍬 Total Sugars0.1 g
🧂 Sodium2 mg

*Disclaimer: The nutritional values provided here are estimates generated for reference only and may vary based on exact ingredient brands and preparation techniques. Please calculate your nutrition independently if following a strict diet.

Chef's Notes & Tips

Chef’s Note

  • Culturing the malai with a spoonful of dahi before churning gives the finished ghee a richer, more traditional aroma and flavor profile.

Tips & Tricks

  • Always use cold water when churning the malai in the blender to help the butter separate quickly and cleanly.
  • Do not throw away the leftover chaas; use it for kadhi, curries, or season it as a refreshing spiced buttermilk beverage.

✨Paya Cleaning✨

By Chefjuzer • •
🏷️ Category: Basics 🌱 Type: Non-Vegetarian ⏱️ Prep: 15 minutes 🔥 Cook: 0 minutes
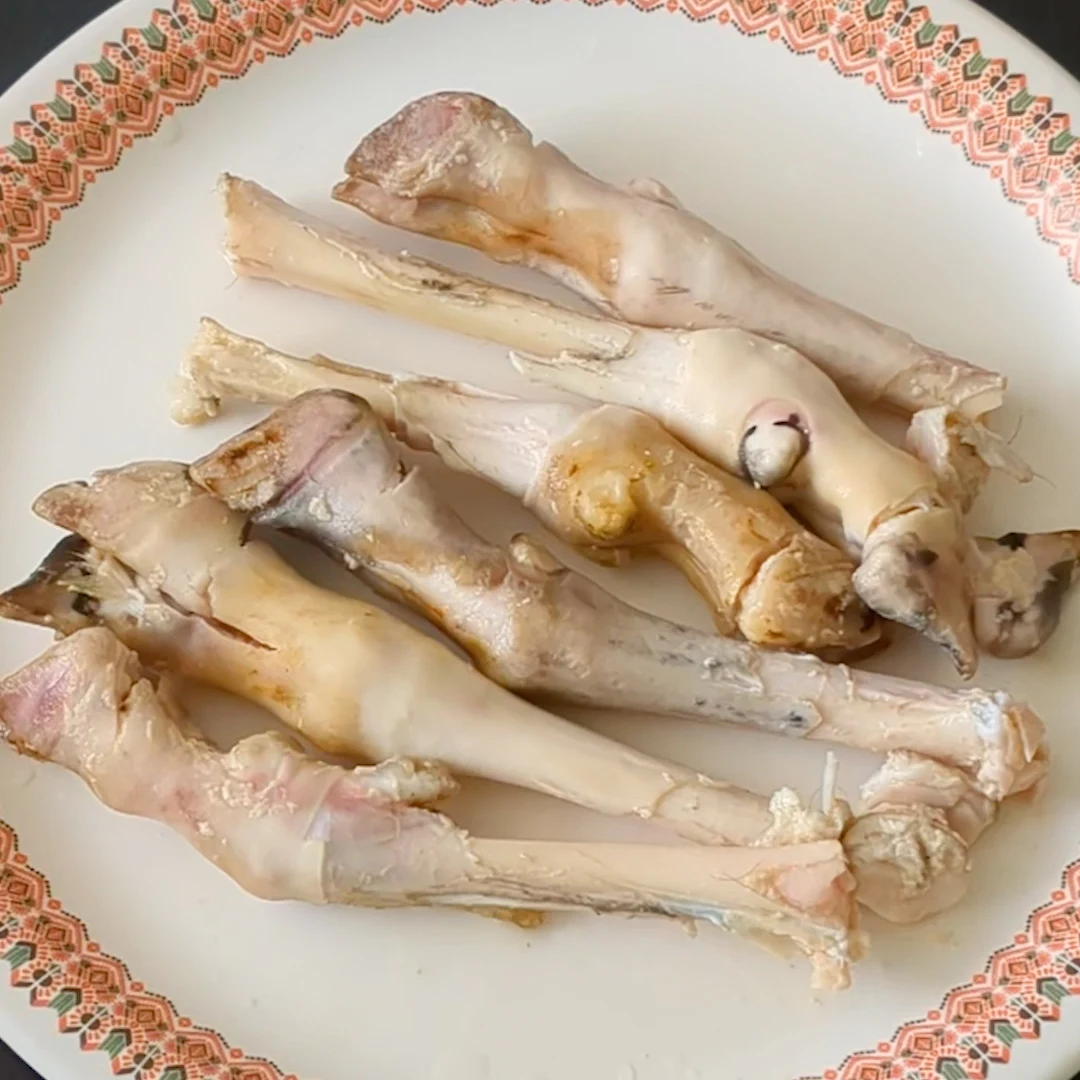
✨Cleaning Goat or Lamb Trotters (Paya)✨

A simple but essential method for cleaning goat or lamb trotters before cooking

Proper cleaning helps remove surface dirt, tiny hairs and any unwanted odour, giving you a clean base for any Paya recipe.

Ingredients List
gms
💡 Adjust yield to recalculate ingredients
Sr. Weight Units Name
• 1000 g Goat or Lamb Trotters (Paya)
• 3 tbsp Wheat flour (atta)
• 1 batch Water, as required
Method / Instructions
  1. 1. Wash the Paya: Begin by washing the trotters thoroughly under running water to remove any surface dirt and residue.
  2. 2. Clean with Wheat Flour: Sprinkle wheat flour (atta) all over the trotters, gently massaging and rubbing it over every part to loosen tiny hairs and particles. Be careful of sharp bone edges.
  3. 3. Wash Again: Wash thoroughly under fresh running water until flour and loosened residue are completely removed. Inspect each piece and repeat if any hairs remain.
  4. 4. Drain: Transfer the cleaned Paya to a colander and allow excess water to drain completely before marinating or cooking. Jamjo ane Jamarjo!
Nutrition Facts (Per 100 gms servings)
Nutrient (Basic) Amount (Approx.)
🔥 Calories115 Kcal
💪 Protein14.5 g
🌾 Carbohydrates3.2 g
🥑 Total Fat4.8 g
🧈 Saturated Fat1.8 g
🌱 Dietary Fibre0.5 g
🍬 Total Sugars0.1 g
🧂 Sodium85 mg

*Disclaimer: The nutritional values provided here are estimates generated for reference only and may vary based on exact ingredient brands and preparation techniques. Please calculate your nutrition independently if following a strict diet.

Chef's Notes & Tips

Chef’s Note

  • Thorough cleaning with wheat flour is an essential step to eliminate any residual odour and ensure your Paya broth is clean and aromatic.

Tips & Tricks

  • Exercise caution while rubbing wheat flour onto the trotters, as the small joint bones can feature sharp edges.
  • Always inspect each piece carefully under running water after the flour wash and repeat if any fine hairs remain attached.

✨Khichda Na Ghau - Khandela Gheu✨

By Chefjuzer • •
🏷️ Category: Basics 🌱 Type: Vegetarian ⏱️ Prep: 2 hours 🔥 Cook: 10 minutes
✨Khichda Na Ghau (Khandela Ghau)✨

Homemade Khandela Ghau for Khichda

Often, we live in places where Khichda Na Ghau, also known as Khandela Ghau, is not easily available. So, what do you do? Simple. Make it at home!

This is how I prepare Khandela Ghau so that it is ready to use when you want to make Khichda.

Ingredients List
gms
💡 Adjust yield to recalculate ingredients
Sr. Weight Units Name
• 1000 g Whole wheat (Ghau), mature and clean
• 1 batch Water, as required
Method / Instructions
  1. 1. Soak the Wheat: Take good-quality whole wheat according to your requirement. Ensure it is clean, mature, and heavy with a good golden colour. Submerge completely in water and soak for 1–2 hours until softened.
  2. 2. Lightly Break the Outer Skin: Drain soaked wheat and transfer to a mixer-grinder jar. Pulse 1–2 times, shake jar well, and repeat 2–3 times total. The goal is to loosen and scrape the outer skin without crushing the grain into powder.
  3. 3. Wash the Wheat: Transfer processed wheat to a bowl, add water, wash gently with your hands, and pour off dirty water completely until reasonably clean.
  4. 4. Drain and Dry: Transfer washed wheat onto a clean cloth, squeeze gently to remove excess water, and spread evenly on a tray or plate to dry completely in sunlight or a well-ventilated area.
  5. 5. Clean the Dried Wheat: Once completely dry, gently toss in the tray to separate loose husk (bussa) and unwanted particles. Clean thoroughly. Jamjo ane Jamarjo!
Nutrition Facts (Per 100 gms servings)
Nutrient (Basic) Amount (Approx.)
🔥 Calories340 Kcal
💪 Protein12.0 g
🌾 Carbohydrates72.0 g
🥑 Total Fat2.0 g
🧈 Saturated Fat0.4 g
🌱 Dietary Fibre10.5 g
🍬 Total Sugars0.4 g
🧂 Sodium5 mg

*Disclaimer: The nutritional values provided here are estimates generated for reference only and may vary based on exact ingredient brands and preparation techniques. Please calculate your nutrition independently if following a strict diet.

Chef's Notes & Tips

Chef’s Note

  • Always choose clean, mature, and heavy wheat with a good golden colour; grain quality directly impacts the texture of your final Khichda.
  • Use the pulse function carefully so you only scrape and crack the outer bran rather than pulverizing the wheat.

Tips & Tricks

  • Check the wheat after each quick pulse round to prevent uneven cracking.
  • Ensure the washed wheat is thoroughly dried in the sun or a well-ventilated space before storing to prevent moisture build-up.

✨ Bilista (Fried Onions) ✨

By Chefjuzer • •
🏷️ Category: Basics 🌱 Type: Vegetarian ⏱️ Prep: 15 minutes 🔥 Cook: 20 minutes
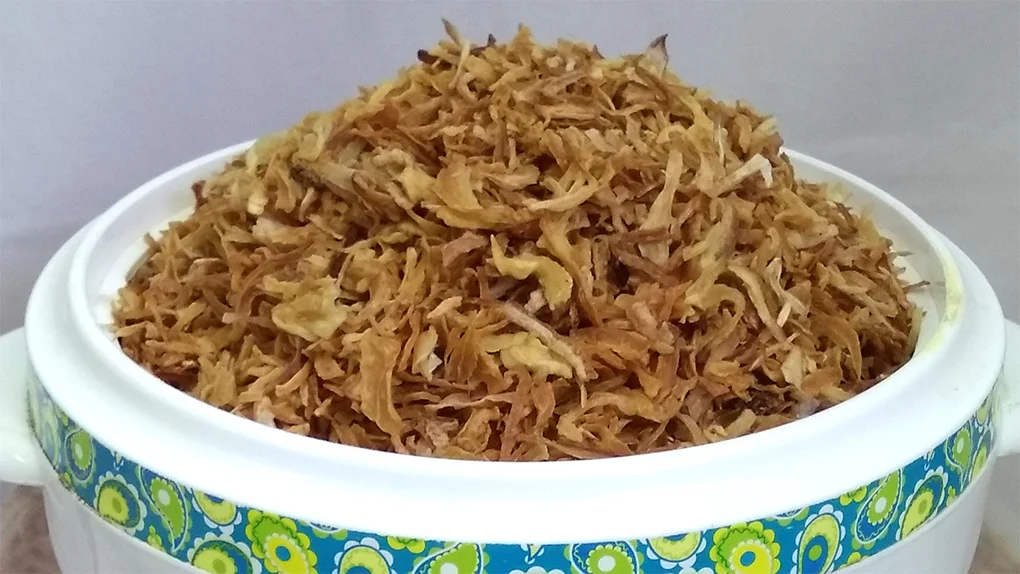
✨Bilista (Fried Onions)✨

The golden base of countless gravies

Crispy, deep-golden fried onions, known as Bilista in Bohra households, are an essential preparation for pulaos, biryanis, gravies, and kormas. The key to good Bilista is even browning without burning or bitterness. Fried correctly, the onions become beautifully crisp as they cool and can be stored for later use.

Ingredients List
gms
💡 Adjust yield to recalculate ingredients
Sr. Weight Units Name
• 500 g Onions, preferably red, thinly sliced
• 1 batch Oil, for deep frying
Method / Instructions
  1. 1. Prepare the Onions: Peel the onions and slice them thinly and evenly. Spread the sliced onions over a clean cloth or paper towel and leave them for 10–15 minutes to remove excess surface moisture and encourage even frying.
  2. 2. Heat the Oil: Heat sufficient oil for deep frying in a deep kadhai or heavy-bottomed pan over medium heat until hot enough to fry steadily.
  3. 3. Fry in Batches: Add a small handful of sliced onions to the hot oil without overcrowding. Fry in batches, stirring frequently with a fork to separate them until light golden brown. Remove before they turn dark brown as residual heat will cook them further.
  4. 4. Drain Immediately: As soon as the onions reach a light golden colour, remove with a slotted spoon and transfer immediately to a paper towel-lined tray, spreading them out.
  5. 5. Cool and Crisp: Allow the Bilista to cool completely so they become noticeably crisp.
  6. 6. Store: Once completely cool, transfer the Bilista to an airtight glass jar or container lined with kitchen paper. Store in a cool, dry place. Jamjo ane Jamarjo!
Nutrition Facts (Per 100 gms servings)
Nutrient (Basic) Amount (Approx.)
🔥 Calories95 Kcal
💪 Protein1.2 g
🌾 Carbohydrates9.5 g
🥑 Total Fat6.2 g
🧈 Saturated Fat0.8 g
🌱 Dietary Fibre1.8 g
🍬 Total Sugars4.2 g
🧂 Sodium5 mg

*Disclaimer: The nutritional values provided here are estimates generated for reference only and may vary based on exact ingredient brands and preparation techniques. Please calculate your nutrition independently if following a strict diet.

Chef's Notes & Tips

Chef’s Note

  • Slice the onions evenly so they cook at the same rate.
  • Never overcrowd the oil. Frying in small batches gives better browning and crispness.
  • Remove the onions while they are light golden, not dark brown. They continue to cook and deepen in colour after frying.

Tips & Tricks

  • Drying the sliced onions for 10–15 minutes before frying helps reduce excess moisture and promotes better crisping.
  • Stir the onions frequently with a fork to separate them and prevent darker pieces from burning before the rest are ready.
  • Spread the fried onions out immediately after draining. This helps them cool and crisp instead of becoming soft from trapped steam.

✨Nihari Masala✨

By Chefjuzer • •
🏷️ Category: Basics 🌱 Type: Vegetarian ⏱️ Prep: 30 minutes 🔥 Cook: 15 minutes
✨Nihari Masala✨

A treasured spice blend crafted for rich, slow-cooked morning delicacies!

Nihari Masala is one of the most treasured spice blends, crafted for the iconic dish slow-cooked through the night and enjoyed in the early hours before sunrise. This balanced and nostalgic recipe carefully roasts each whole spice to create a warming, aromatic blend that seasons up to 2 kgs of mutton effortlessly.

Ingredients List
gms
💡 Adjust yield to recalculate ingredients
Sr. Weight Units Name
For Roasting
• 25 g Coriander seeds (akha dhania)
• 10 g Cumin seeds (jeera)
• 10 g Fennel seeds (saunf)
• 10 g Black peppercorns (kali mirch)
• 5 g Cloves (loong)
• 5 g Ajwain
• 5 g Green cardamom (hari elaichi)
• 5 g Star anise (badiyan phool)
• 5 g Black cardamom (badi elaichi)
• 2 g Bay leaves (tez patta)
For Mixing
• 10 g Salt (namak)
• 5 g Black salt (kala namak)
• 20 g Dry ginger powder (sonth powder)
• 10 g Dry garlic powder
• 10 g Dry onion powder
• 10 g Turmeric powder (haldi powder)
• 25 g Red chilli powder
• 25 g Kashmiri red chilli powder
• 1 g Citric acid
Method / Instructions
  1. 1. Dry Roast Spices: In a pan on low heat, dry roast coriander seeds, cumin seeds, fennel seeds, black peppercorns, cloves, ajwain, green cardamom, star anise, black cardamom, and bay leaves until aromatic and crisp. Let cool completely.
  2. 2. Grind Spices: Transfer the roasted whole spices to a mixer-grinder and pulse into a fine powder.
  3. 3. Combine Powders: In a large mixing bowl, combine the freshly ground roasted spices with salt, black salt, dry ginger powder, dry garlic powder, dry onion powder, turmeric powder, red chilli powder, Kashmiri red chilli powder, and citric acid.
  4. 4. Sieve & Store: Pass the entire spice blend through a fine sieve to achieve a silky-smooth texture. Store in an airtight container for future use. Jamjo ane Jamarjo!
Nutrition Facts (Per 100 gms servings)
Nutrient (Basic) Amount (Approx.)
🔥 Calories310 Kcal
💪 Protein11.5 g
🌾 Carbohydrates48.0 g
🥑 Total Fat9.2 g
🧈 Saturated Fat1.2 g
🌱 Dietary Fibre18.5 g
🍬 Total Sugars4.2 g
🧂 Sodium6500 mg

*Disclaimer: The nutritional values provided here are estimates generated for reference only and may vary based on exact ingredient brands and preparation techniques. Please calculate your nutrition independently if following a strict diet.

Chef's Notes & Tips

Chef’s Note

  • Always roast the whole spices on low heat; high heat can make the masala bitter and ruin the aroma.
  • Sieving the finished masala gives it a silky texture which is crucial for a smooth Nihari gravy.

Tips & Tricks

  • Citric acid adds a gentle tang while helping preserve and maintain the freshness of the spice blend during storage.
  • Kashmiri chilli powder provides rich color and mild sweetness, while regular red chilli powder balances the heat.
Enlarged Recipe View